As a loyal fan of SMZDM, on the occasion of the New Year, I started my keyboard and did a keyboard man. I sent SMZDM to greet the New Year draft and wished that my born year would be smooth and safe. I’m going to celebrate the New Year and I invite my friends to come and play in my home. Everyone hasn’t met in 2 years. I haven’t invited them to visit since I moved to my new home. I’m here for the New Year and everyone gathers together. When we discussed what we were going to play in the group, we thought of our loved ones and played live football on the PS. So this article created a tossing process.
My PS3 has not been opened for 4 years. I haven't moved after I moved to a new house. When I started the cracking game, I needed an electronic dog. That is the U disk like the one in the figure below. Only then can I start the homemade program and guide the crack. The game, the map is from the Internet to find, and I do not remember where I was put, but I know this thing is no longer needed, after so many years of changes, PS3 has a more powerful crack, free of electronic Dog homemade system. 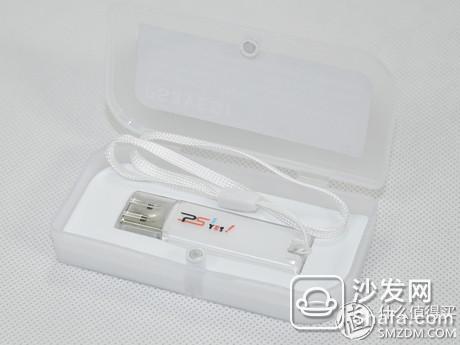 The game site I used to go to most often is TGBUS, which provides various firmware, tutorials, games, etc., so this time I still go to this site to search for how to update the firmware.
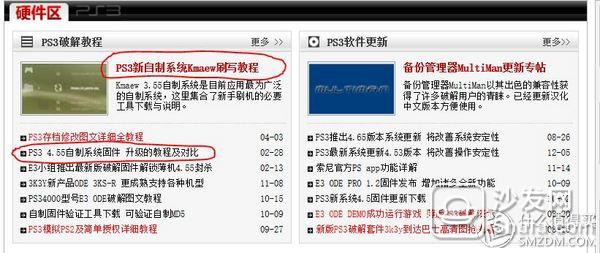
From the PS3 area, crack the first tutorial: PS3 new home-made system Kmaew brushing tutorial. From this article, you can understand that the current firmware has been free of electronic dog. The advantage of the electronic dog is too obvious. It can take up less of a USB port, insert an electronic dog into the PS3, and then hang a hard disk, there is no extra mouth to the handle. Charging, and starting with the electronic dog is too cumbersome to save some steps.
 PS3 PS3 new home-made system Kmaew flashing tutorial - video bus ps3.tgbus.com direct link first stage, upgrade PS3
 The first step is to upgrade the official 3.55 system. Then I'll take a look at my original system number to avoid the refreshed version of the homemade system. Of course, I know this is not possible. Then I upgrade through U disk. The downloaded official 3.55 firmware is placed in the USB flash drive PS3/UPDATE directory, and the file name must be PS3UPDAT.pup. In this way, the PS3 can be automatically recognized. After the upgrade, enter the Settings - Host Settings - Host Information page again to check the system number.
The second step is to upgrade the 3.55 home-made system Kmaew and install the 3.55 home-made system in the same way as in step one.
The third step, this step is the most confusing, because the original text has been modified to make people confuse, because the original mentioned in these two phrases, "has full LV1 and LV2 permissions, can make a variety of backup management "Backup Manager" runs the game "," MultiMan backup management has been updated 1.13, now players can not rely on LV2 patch to run the game directly ", so in fact, in the third step you can not install level2 patch, and directly install MultiMan can Running the game, after all, I still remember to start the game through MultiMan.
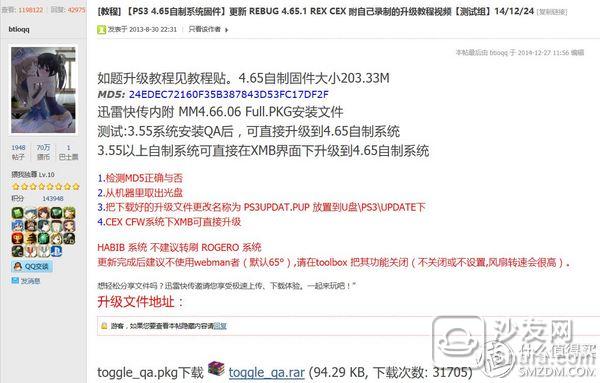
But from other hacked articles on this site, you will find that it is implemented in the latest cracking system which is far higher than the 3.55 cracking system, so I started a new firmware upgrade. Refer to the site of the second article to crack the article: PS3 4.55 homemade system firmware upgrade tutorial and comparison
PS3 PS34.55 homemade system firmware upgrade tutorial and comparison - video game PS3 PS3 4.55 homemade system firmware upgrade tutorial and comparison - video bus ps3.tgbus.com direct link Inside is to introduce how to upgrade the 4.55 home-made system, there are three major crack system comparison, you will also notice that there is a video link under the page, you can open to see the reference, you can more intuitive understanding of the upgrade steps.
First download the 4.55 self-made system REBUG, open the forum download link, will enter their forum website, there are more detailed steps, the most important two sentences is "test: 3.55 system installed QA, you can directly upgrade to 4.65 home-made system" And "3.55 or more home-made systems can be directly upgraded to 4.65 home-made systems under the XMB interface", so do not think 3.55 home-made system can directly upgrade the 4.55 home-made system, you must first install QA, this program also provides downloads on this forum page, then enter The fourth step in my entire process.
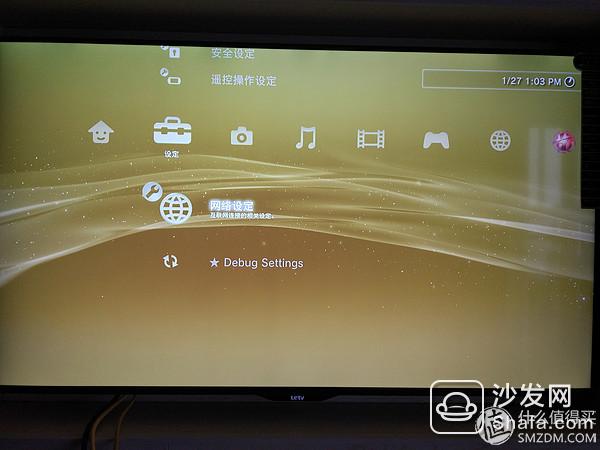
The fourth step, install the QA program, install pkg need to refer to the first page of the hack tutorial on how to install the level2 patch method, because they are pkg, so the steps are the same, will be downloaded before the toggle_qa.pkg put Into the U disk root directory, here to emphasize that must be the root directory, can not be placed on the PS3 directory like the firmware, then go to the "game" icon under the "Install Package Files" menu to install QA program, after installation, refer to the second The video in the cracking tutorial, you will know that you can enter the settings, the cursor moves to the "Network Settings", do not enter, press the following keys: L1 + L2 + L3 (press the left stick) + R1 + R2 + arrow keys The next key, there will be Edy Viewer, Debug Settings and Install Package Files three options to confirm the successful installation of QA,
The fifth step is to install the 4.55 self-made system REBUG, install the 4.55 self-made system in the same way as in step 1, and the new firmware upgrade is completed.

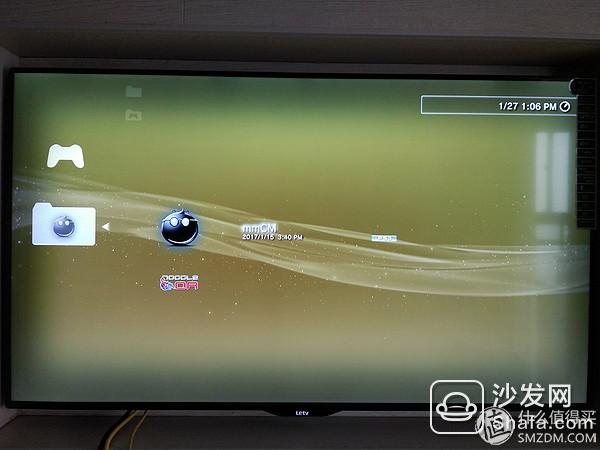
The sixth step is to install the latest MultiMan 04.76.00. This download will go to Baidu search and it will be installed. The installation method is the same as the QA program installed in the fourth step. After installation, it comes with mmCM and webMan.
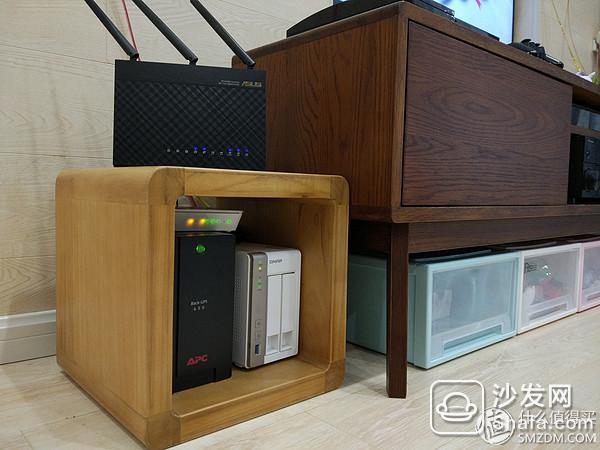
Now I can insert my external hard drive box into a fun and entertaining way, loading various games, and the first time loading will be slower. But my family has a QNAP NAS, can you put the game on the NAS automatically loaded, so that you do not have to drag a hard drive to continue my toss
The first reference to similar articles at this time happens to be from SMZDM.
 QNAP QNAP NAS TS-212P Application Series Part I: Practice Based on QNAP platform to build PS3NETSRV service additional changes (2015-01-01 18:06:07): There are 2 errors in the text, thank you for pointing out. PS3 system version should be 4.65, R6300 now only V1 and V2, I use V2. 300M router is a wireless parameter, lan mouth is 100M. In addition PS3 wireless network card is slag, do not consider using wireless connection. I've sun-dried my TS-212P before, and introduced some simple enterers | Likes 46 Comments 70 Collections 277 View Details
 But inside the PS3NETSRV file is not suitable for my NAS, you must find out what type of your NAS CPU, the author's NAS CPU for the Marvell, and my NAS is QNAP TS251, the CPU is Intel x86, so Need to download, this step will be mentioned in the download link, the PS3netsrv file is used for NAS to start PS3 network services, so PS3 can view the NAS resources through the intranet.
The second step in the article is to use the nohup command. If you do not use nohup, the service will be stopped if the connection is disconnected. Therefore, the nohup command can keep the PS3NETSRV service running in the background. Only the shutdown or restart will disconnect. The nohup command is required to install Optware IPKG. Optware is an operating environment similar to third-party software in the DD-WRT system. Why is it called optware because this environment is installed in /opt, it is worth noting that this opt It also has its own /bin, /etc, /lib and other directories, which are basically similar to a complete linux environment. Optware's software has been compiled, download and install through ipkg software, as long as you know the software name can be installed by ipkg install software name.
Ipkg update command, ipkg will download and update the latest software package list at http://downloads.openwrt.org/whiterussian/packages/
Ipkg install coreutils is to install the toolkit containing nohup instructions
Next is to assign a path to the PS3NET SRV to store your PS3 games, or Blu-ray and other resource files. Finally, the nohup command turns on the PS3NET SRV service, and the environment is set up. Then the PS3 can scan the NAS resources. Specific steps are as follows:
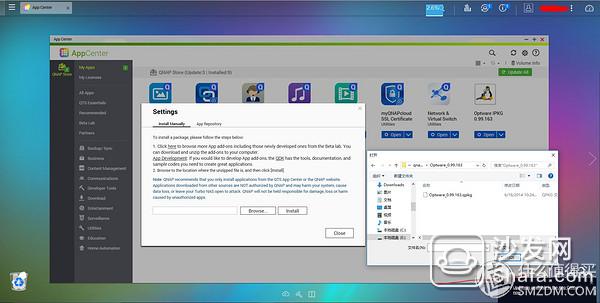
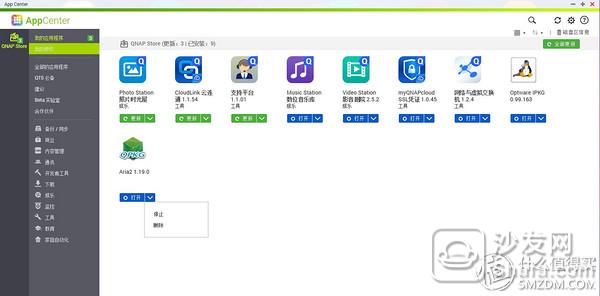
The first step is to install Optware IPKG, but this program is no longer available on the QNAP AppCenter. You need to download it separately. Through the Baidu search to download link, this sharer's NAS happens to be similar to my QNAP TS451, providing exactly what I need. The entire package contains the x86 PS3NETSRV, Optware IPKG, and Aria2 (this will be discussed later).

After downloading, enter the NAS management platform AppCenter to install manually, you need to click on the Settings button in the upper right corner, then click on the Browser to select the Optware qpkg file path you downloaded to install, after installation, you will see the Optware IPKG icon At this point, you need to restart the NAS to make the installation work.
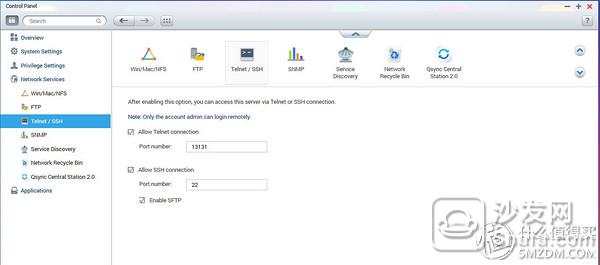
The second step, get the tool with nohup command, access your NAS through putty tool (with telnet command) telnet, of course, you have to open your NAS telnet. Open the NAS Control Panel, Network Services - Telnet, the default port number is 13131.
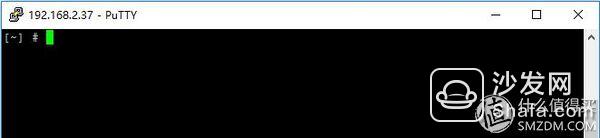
Then you can access it through telnet. You need to enter your administrator username and password when logging in. After the login is successful, it will be displayed.
Run the ipkg update command and ipkg install coreutils so that your NAS can run the nohup command.
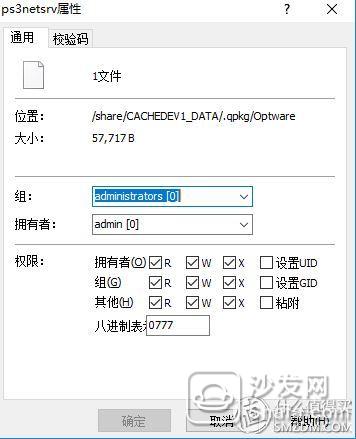
The third step, upload PS3NETSRV to NAS, this needs to open the SFTP service, the default port number 22, it is recommended to use the winscp tool for connection access, also need to enter the administrator user name and password, you can see the directory structure after opening, enter /opt directory

Then upload your ps3netsrv file to this directory and right-click to modify the file's attributes and give it all rights, including R.
The fourth step, build PS3NETSRV, continue to operate on winscp, return to the root directory, open the /share directory, and then create a PS3 directory in the share directory, and then create GAMES to store all PS3 games, I copied from the external hard drive A game played during the New Year's Eve will go to this directory.

The fifth step is to run PS3NETSRV through nohup, follow the method in the second step, access the login via telnet, and then enter the following command nohup /opt/ps3netsrv /share/PS3. This directory is the directory we just created in the fourth step PS3. Then close telnet, re-open a telnet, run ps -a to see the process, you will find that the previous command has been run successfully.

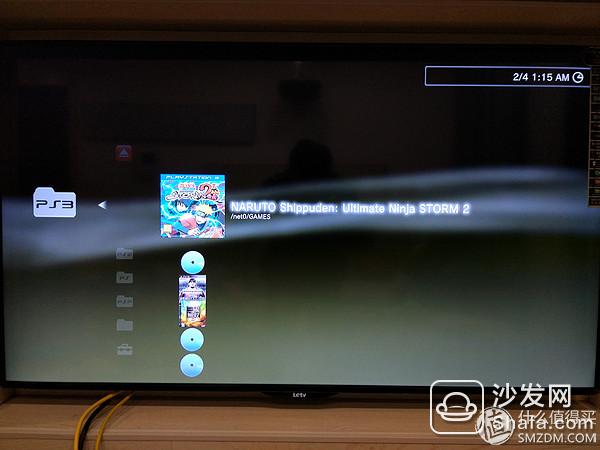
The sixth step is to set the scan NAS address on the PS3, because when installing the latest version of mm, webman has been installed, so I also use webman to scan and load, just enter webman's setting interface, http://192.168.2.101/index .ps3, where the ip address is the IP address of your home PS3, please modify it yourself, of course, can also be set through the TV handle operation, open the interface as shown in the figure, you need to fill in your NAS in the ip address behind Scan for LAN games At the address, webman will automatically scan out all the resources and click Save.

This way your PS3, open webman games-PS3 games, you can see on the TV, has loaded the game on the NAS, randomly select the game you want to play to load, play it fun.
But I want to play the game, there is no hard disk how to do, I have to go download it, download a good place for the game is a natural Ranger network, a variety of games rich release in a timely manner, although not on a long time, but it seems that the forum is still hot, The resources inside there are not only Thunder but also Baidu Cloud. Since I have a NAS, why not let my NAS download offline Thunder or Baidu cloud resources, then go to the third stage.
The third stage, NAS download Baidu cloudWhy not set up Thunder, because I do not have Thunder VIP account, this needs to be charged to achieve off-line download, so give up the Thunder first, refer to the article is also from this site
 QNAP QNAP Cloud NAS Thunder + Baidu Cloud Offline Remote Download Solution Additional Modification (2016-06-26 16:11:19): Currently in QNAP's APP Center, Baidu Cloud has been removed, and Optware's download page has also been QNAP deleted, so the method of deploying the Optware environment in this article is not applicable. Thanks to the users mentioned in the comments area, Entware can be used as an alternative to Optware. So the first step in the second major point in the original text: "Deploying Op Sky Clouds | Like 153 Comments 168 Favorites 994 View Details
 The method described here is to install aria2 first, then install the aria2 GUI, configure the NAS address to connect, but I encountered a problem with the connection server failure. The aria2 I used was not installed via opkg as described in this tutorial, because I was using a separately installed Optware, and the opkg commands on the system did not work properly. So I installed the aria2 shared in Baidu Cloud mentioned in the first step of the second stage before, it is a qpkg file, so the connection after installing this aria2 hits a small problem, and it is found through the discussion in the sharing page. , The default username and password need to be filled in

Original aria2 version of the configuration file, set the default user name and password, so I can fill in the default user name password, or simply modify its configuration file, the user name and password clear it. Then you need to use a Baidu SkyDrive assistant to export to aria2 for download. Specific steps are as follows:
The first step is to install Aria2. In the first stage of the second phase, you have obtained the qpkg file for Aria2_1.19.0_x86. Follow the same method to install and open it so that it will be started after each shutdown and restart of the NAS.
The second step, install Aria2 GUI, first check and open the NAS on the Web service, this is in the application service, the default web server port is 80

Download the Aria2 GUI from the github site, because it is an open source project. After unzipping it, you can get the webui-aria2-master folder. You can change the name of the folder to aria2, and then transfer the folder to the NAS web directory. There are too many methods to pass in. You can follow the previous sftp method. You can also use the file station or network share folder.

After uploading, you can access Aria2 through the intranet address. The IP address is the address of your NAS. Click on the connection settings in the upper menu to enter the following interface to check the address of your NAS.
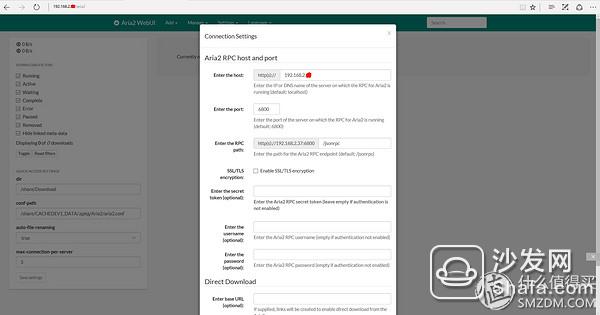
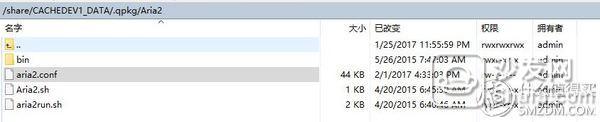
As I mentioned earlier, the first time you connect, you need to fill in the default username and password to connect successfully. Of course, I can also modify the aria2 configuration file, follow the previous method, connect to the NAS through winscp, enter the directory where qpkg installs aria2, find the aria2.conf configuration file, and edit it.
There are many configuration items inside, as long as the following three lines commented out just fine
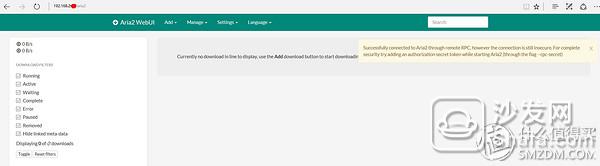
#rpc-passwd=key #rpc-secret=secrettoken #rpc-user=userThen you can connect successfully in aria2's connection settings without having to fill in the username, password, and key.
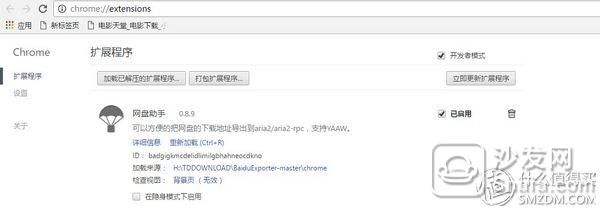
The third step is to install Chrome Baidu cloud offline download plug-in, because I do not over the wall, so you need to look for another, in fact it is also an open source project, provide source code on Github, go to and package download, and then follow the installation instructions to install , Recommend the use of Chrome plug-in, here to remind you, we must use the latest version of Chrome, if your Chrome is older, support for this plug-in will be a problem.
Chrome: Click Settings -> Extensions -> Check Developer mode-> Load unpacked extension, navigate to the chromefolder, click OK.
The fourth step is to download Baidu Cloud offline and install Baidu Cloud Offline to download the plug-in. When you use the Chrome browser to open Baidu Cloud, click any resource and you will see an additional export button. This button It is possible to directly export Aria2 RPC for download
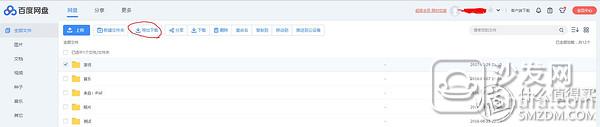
After clicking on the ARIA2 RPC, you will see this resource downloaded in the Aria2 GUI, but from the perspective of my current use of the effect, some resources are fast, some resources seem to be limited, the speed does not come, the worst The situation is that downloading to a certain extent may also be blocked by Baidu. Before you download it, it will be white. Currently, no good method has been found. It seems that Baidu is still quite smart.
supplementBasically after these three stages, my PS3 has completely revived. I can play all kinds of games and movies downloaded from Baidu Cloud and store them on the NAS without using an electronic dog or dragging an external hard disk. Want to download and download, although I do not have time to play the game, but look at the movie is also good, by the way mmCM which provides a strong movie player called Showtime Media Center, you can see the NAS movie, but also outside subtitle

When you want to play the game needs to install updates, but the speed of online installation is very slow, this time, you can use the offline installation method, first load the game you want to play, this must be loaded, otherwise install the update package is not For your game. Then download the update package you downloaded from the Internet and upload it to PS3 via winscp and FTP. Simply log in anonymously.

Upload your package to the packages directory

Install the package through the management of the PS - Install the PKG file - PS3 system storage, you can see the update package, and install
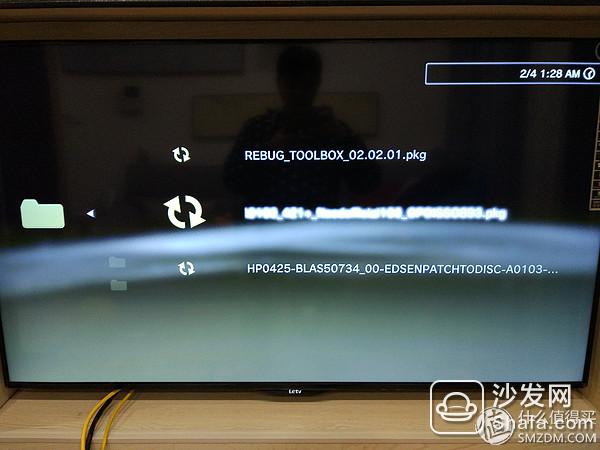
Then start your game again and you don’t have to update it online automatically

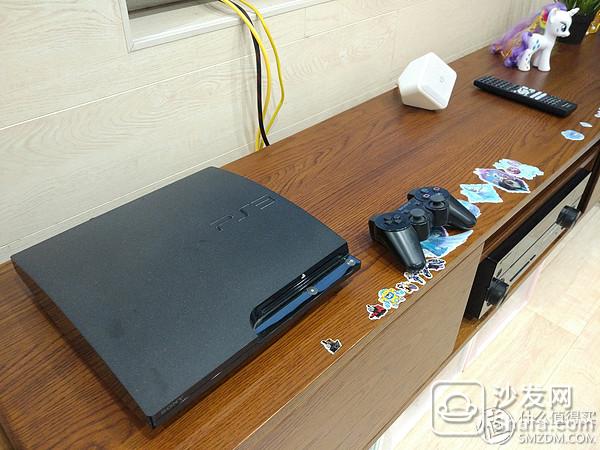
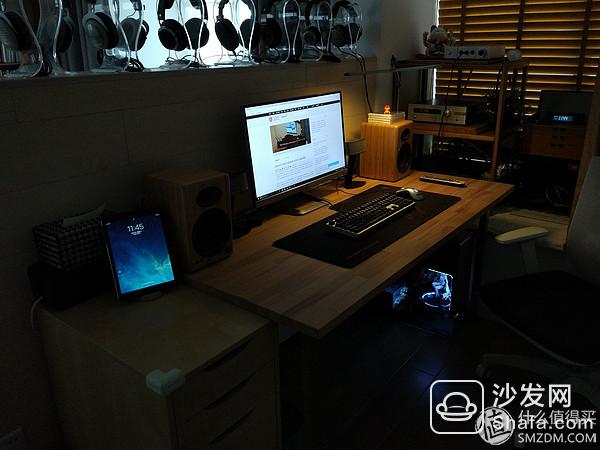
Give my living room environment

This article was written from the year before to the end of the Chinese New Year. It took about three hours in the morning to sigh. It was not easy to record an article. Whenever I saw an excellent article on SMZDM, I truly admire the authors and appreciate me. The silver two pay tribute. Finally, I wish you all a happy New Year. In the happy life of the new year, you will soon start a new year of work. I hope that you will be safe, happy, happy, and most importantly hope the whole family in your life. Health, happiness and happiness!
At the end of the day, there was no time to finish writing the last year's table and the world's text to see how it was born.
Pressure Gauge,Manometer Pressure Gauge,Automobile Pressure Gauge,High-Quality Pressure Gauges
ZHOUSHAN JIAERLING METER CO.,LTD , https://www.zsjrlmeter.com